The file is one of the most basic and essential tools found in the modeler’s
armamentarium. The proper file can rough out a shape rapidly or refine
and smooth the finest of details. Having a good selection of files will
enhance your creative potential. While files seem so common, they are
actually quite amazing tools. The first files were made completely by
hand with each tooth formed by striking a chisel at the proper angle and
interval. The first successful file cutting machines came into use in
the mid eighteenth century. This, along with improvements in the refining
of iron ore into steel and better heat treating processes, led to the development
of the modern files.
The basic parts of file are shown in Fig. 1. Files are sized by length.
American and Swiss files are measured differently.
Files are graded according to the degree of fineness or coarseness and
whether the teeth are single or double-cut, Fig. 2.
Single cut files have rows of teeth cut parallel to each other at an angle
of 65 degrees from the centerline. Sometimes referred to as “Saw Files,”
Single cut files are used for sharpening tools, finish-filing and draw-filing.
They are also the best tools for smoothing the edges of sheet metal.
Double-cut files have rows of teeth crisscrossed so the teeth become diamond-shaped.
The first row of teeth is called the overcut. On the top of these rows,
a second set of teeth is cut at a different angle to the file axis. This
row is known as the upcut and is finer than the overcut. Double-cut files
are generally used for rough work and fast removal of material. They are
sometimes referred to as "Machinists’ Files".
Curved-cut is an arrangement of file teeth in curved contours across the
working face of the file. The teeth are milled with a decided undercut
(or positive rake). These files are used mainly for automobile body repair.
Rasp-cut is a pattern by which each tooth is formed individually by a
single-pointed tool or punch. These files are generally used for wood.


Some files have edges that are uncut or smooth. This edge is often
referred to as a “safe edge.” These files are extremely useful for highly
precise detail work, Fig. 3.
The fineness or coarseness of a file indicates the spacing of the teeth
and the number of teeth per inch, Fig. 4. There are four different grades
for American Pattern Files: Coarse Cut, Bastard Cut, Second Cut, and Smooth
Cut. They range in that order from fewest to most teeth per inch. The
differences from Coarse to Smooth are relative to the length of the file
because coarseness of a file increases as the length from point to heel
increases. In other words, a 6” file, either single or double-cut, has
more teeth per inch than a 12-inch file.
Swiss pattern files are graded from 00 – 6, with 6 being the finest.
They are commonly sold in sets of grades 2, 4, and 6. Swiss pattern files
are always double-cut.


It is easier to learn how to operate a lathe than it is to learn the techniques
of proper filing. The ability to achieve precision with a file is an art
and the mark of a true craftsman. In the old days, an apprentice would
be given exercises that would require him to file a perfect cube or file
two pieces that were to fit together perfectly. The only way to master
these techniques is to practice.
There are three basic filing operations:
Straight-forward filing: in which the file is pushed straight ahead
across the work. The teeth of the file only cut in the forward stroke.
The file should be carried forward in an almost straight line with the
pressure first applied on the tip in the beginning of the stroke; on the
tip and heel while in the middle of the stroke; and finally on the heel
at the end of the stroke.
If pressure is applied on the return stroke, the teeth are dulled and
the file can be quickly ruined. Except when working with soft materials,
the return stroke should be made with the file lifted clear of the material.
If too much pressure is used on the forward stroke, the teeth are liable
to clog or even shell off (the breaking of teeth caused by excess pressure,
back raking, or filing sharp edges or corners).
A typical beginner fault is rocking the file or trying to remove too much
material at one time. Both actions usually produce a convex surface.
Make sure the file is clean before starting. The file can be easily cleaned
with a file card, Fig 5. One trick is to rub chalk into the teeth of a
new file to prevent the teeth from clogging. Chalking also helps to prevent
pinning (tiny particles of fillings that wedge between the teeth) that
can scratch the work.
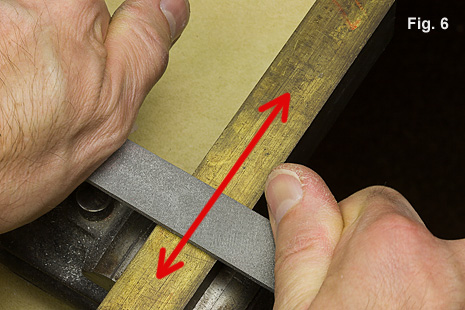
Draw-filing: in which the file is grasped at each end and with
an even pressure, alternately pulling and pushing over the work. The file
is held perpendicular to the direction of motion, Fig. 6. One advantage
of draw-filing is that the file can be held steadily. As a result, a fine
surface finish can be obtained. Draw filing is usually done with a single-cut
mill bastard file or a long-angled lathe file so that the metal is cut
with a true shearing action that avoids scoring. In draw-filing it is
important to balance the pressure over the entire stroke so that a hollow
spot does not develop in the center.

Lathe-filing: in which the file is stroked against the work that is revolving
in the lathe, Figs. 7, 8. Lathe filing is used to smooth out small flaws
from the cutting tool, create a free form shape, or make small corrections.
With the work turning toward you, hold the file at a slight angle and use
a long forward stroke, moving laterally about half the width of the file.
Do not hold the file rigidly or stationary, but keep continually stroking.
Clean the file frequently as it will clog quickly.


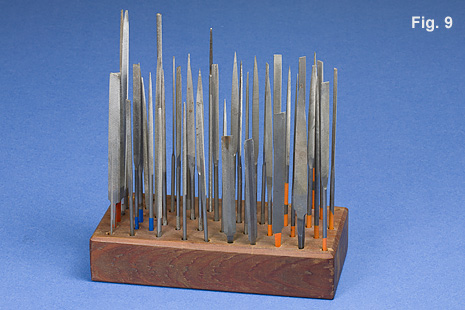
Take care of your files. New files should be broken in on flat surfaces
of soft metals. Use only light pressure. Don’t just throw your files
in a drawer. Care should be taken to keep each file separate. Keep them
in a rack or drawer with partitions, Fig. 9, 10. Be sure to keep files
away from water or moisture and avoid getting them oily. Oil makes the
file slide across the work surface without cutting. Get in a habit of
cleaning your files with a file card before putting them away. With care,
a quality file will last a long time.
Here is a chart of the more common file shapes.
Flat: Considered the “work horse” of files. In a full size file
it tapers in width and cuts on all sides. As a Swiss pattern file it is
more commonly found to be parallel in width and thickness with one edge
safe (uncut).
Equaling: Used for slots, corners, and narrow openings. Equaling Files
are double cut on the sides, single cut on the edges, and are parallel
in width and thickness.
Checkering: Are parallel in width and gently tapered in thickness. They
have teeth cut in a precise grid pattern: Over cut is parallel to file
edges and under cut is 90 degree to over cut. Checkering files are used
for putting serrations on knife edges and to obtain a checkered design
similar to a gun handgrip.
Pillar and Pillar Narrow: Used for precision work or to finish
work begun with a Hand File. Pillar Files are double cut on both
sides, safe (uncut) on the edges, and are parallel in width and taper in
thickness.

Square: A general purpose file also used in corners and holes. Square
Files are double cut on all sides and taper toward the point in width and
thickness.
Three Square: The triangular shape is excellent for use in corners and
on dies. Three Square Files are double cut on the sides, single cut on
the edges and taper toward the point in width and thickness. Despite having
angles of 60 degrees rather than 90 degrees, these files are still referred
to as Three Square simply as a matter of slang.
Barrette: For cleaning gear teeth, keyways, dovetail ways, and sharp
angled slot ways. Barrette Files are double cut on the flat side, safe
(uncut) on the beveled back side, and taper toward the point in width and
thickness.

Crochet: Ideal for filing joints between flat and curved surfaces or
developing slots with rounded edges. Crochet Files are double cut on the
sides and edges and taper toward the point in width and thickness.
Veneer Knife: Similar to Crochet file, but are uniform in thickness
and width.
Round Edge Joint: Are parallel in width and thickness, with rounded
edges. The flats are safe (uncut) and cut on the rounded edges only.
Used for making joints and hinges.
Warding: Ideal for filing slots and removal of burrs after milling
operations. Warding Files are double cut on the sides, single cut on the
edges and taper toward the point in width.

Half Round: Great for curved surfaces and corners. Half Round
Files are double cut on both sides and taper toward the point in width
and thickness. Ring Files are narrower than a standard half
round and taper in width and thickness, coming to a point. Used for filing
inside of rings.
Marking: Similar to half round except flat side is safe (uncut).
Crossing: Excellent for filing interior or curved surfaces. The double
radius makes possible filing at the junction of two curved surfaces or
a straight and curved surface. Crossing Files have two "half round" sides
with one side "flatter" than the other and are double cut tapering
toward the point in width and thickness.
Round Straight: Round
Straight Files are double cut and are parallel in width and thickness.
Round Taper: Round
Taper Files are double cut and taper toward the point in width and thickness.

Pippin: Combines the cross sections of Round and Crossing Files with
the edge of a Knife File and is excellent for finishing junctions or opening
slots with a "V" shape. Pippin Files are double cut and taper
toward the point in width and thickness. (Pippin Files are often referred
to as "Apple Seed" files.)
Knife: Wedge section shape is great for working in slots. Knife Files
are double cut on the sides, single cut on the "knife edge," safe
(uncut) on the back, and taper toward the point in width and thickness.
The knife edge usually has an arc to it.
Slitting: For acute angle filing and where a Knife File will not fit.
Slitting Files are double cut on all four sides, single cut on the edges,
and are parallel in width and thickness.
Slotting: Narrower than slitting file with flat uncut center portion.
Used for creating slots in screw heads