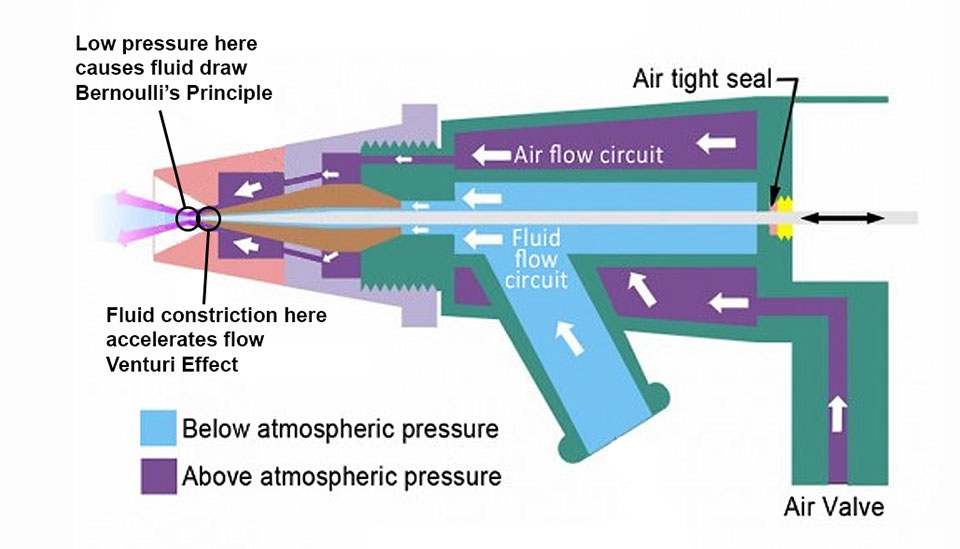
In design, the airbrush is very simple. It uses Bernoulli’s Principle, the effect of a pressure differential as the air emerges from the aircap, to draw the material into the airstream; and the Venturi Effect, to accelerate and atomize the material, as it passes through the constriction in the nozzle.

Anatomy of the Airbrush


Where the material is introduced into the air stream differentiates two major categories of airbrushes: external mix or internal mix.
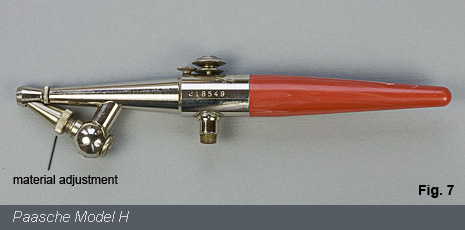
As the name implies, external mix airbrushes introduce the material through a nozzle located outside the main body of the airbrush, or “externally.” The classic external mix airbrush is the ever enduring Paasche Model H. The adjustable fluid tip is located just ahead of the orifice in the air cap. The fast moving air passing over the fluid tip siphons the fluid into the air stream where it is atomized and propelled. The adjustable fluid tip is quite simple and is comprised of only two basic parts: a hollow needle through which the paint is drawn and a threaded nozzle that allows the adjustment of the material flow. A rudimentary adjustment screw is sometimes provided under the air button, but for the most part airflow is basically on or off; controlled by what is essentially a tire valve.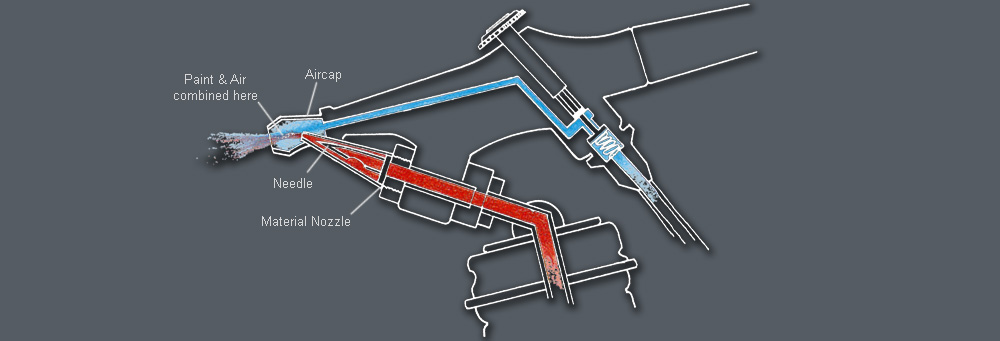
Internal mix airbrushes combine the air and material much closer to the point at which the air exits the aircap. The term “internal mix” is a bit of a misnomer because it implies that the material and air are combined within the airbrush, but that is actually not the case. With this type of airbrush, a centrally located needle and nozzle regulate the material flow, while the head assembly channels air around the outside of the nozzle. The orifice of the material nozzle is usually located flush with the front surface of the air cap. The air and material are combined just as they both exit the airbrush. This arrangement takes maximum advantage of Bernoulli’s principle, resulting in the most efficient system of fluid draw and atomization, even at low air pressure. As with the external mix airbrush, the airflow is essentially on or off.
This diagram represents the head assembly of a simple internal mix airbrush such as the Badger 150. Material is introduced and flows along the needle within the passageway formed in the head and nozzle. As the needle is drawn back, material flow is increased. Air is channeled forward and around the nozzle. As the air moves forward, it accelerates because the size of the passageway is decreasing. The fast moving air draws the material through the passageway and along the needle. Complete atomization occurs at the tip of the needle as the paint is directed off. So despite the name “internal” mix, complete atomization occurs at the needle tip, which in most cases, is external to the material nozzle. The atomization is more complete than the external mix airbrush because the air is introduced in a tight, forced, circumferential flow around the nozzle.
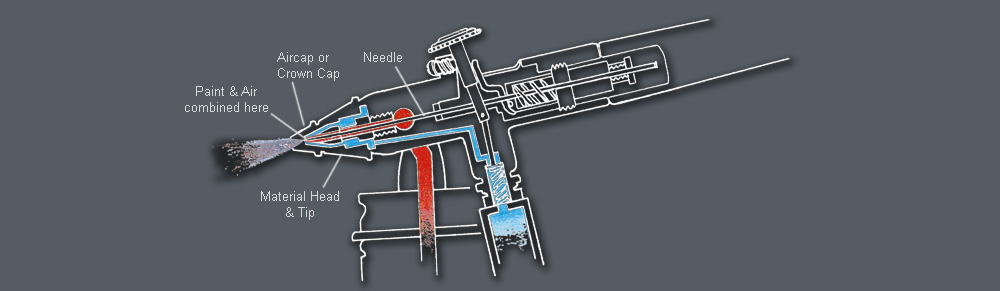
Depending on the design of the airbrush, the forward most piece may function differently. This diagram is of a simple internal mix design. In this case, the front-most piece is integral to the airflow. Because of this, it is labeled as an air cap. Loosening this piece slightly will disturb the airflow and cause stippling. Loosening it more will cause air to flow back through the material tip. More sophisticated designs use a separate air cap and paint cap or crown cap. A paint cap is used to control the pattern or spread of the spray. The function of a crown cap is to protect the needle. Removing a crown cap does not disturb the airbrush function and allows the artist to get closer to the surface. Without the crown cap in place, care must be exercised so that the needle is not damaged.
Airbrushes are further distinguished by what is termed, their “action.” The “action” refers to how the material flow is regulated. Airbrushes are either single or double action. Single action airbrushes separate the control of the material and air. The airflow is controlled with the trigger. Material flow is controlled by a separate screw adjustment. Two examples of single action airbrushes are the Paasche Model H and the Badger 200, Figs. 7, 8.

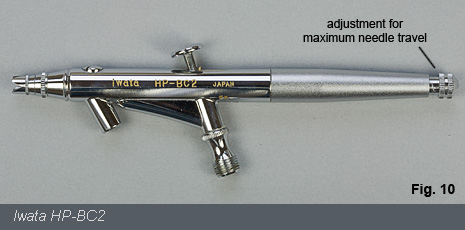
Double action airbrushes allow the adjustment of the material with the same trigger that controls the air. This provides much more precision and the ability to vary material flow while spraying. After depressing the trigger to begin the airflow, the trigger is rocked back to allow the flow of material, Fig. 9. Double action brushes can be outfitted with a preset handle that will allow the setting of maximum desired opening, Fig. 10.

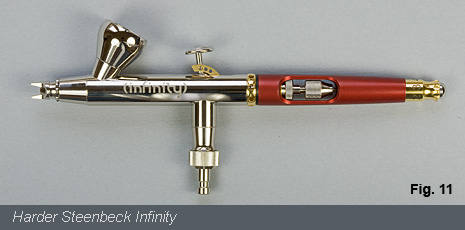
There are two main ways that material is fed into the airbrush. The first method is known as gravity feed. In this style of airbrush, the material cup is located most commonly on top of the airbrush, Fig. 11. However, some airbrushes are fitted with a side cup. The side cup still functions as a gravity feed while providing the freedom to alter the angle of the cup. Here again, the term “gravity feed” is deceiving. The material is still siphoned from the cup; otherwise, the material would be flowing all the time. So, in gravity feed airbrushes, gravity is only offering assistance to the material flow. This type of airbrush works better for thinner materials where the air pressure can be reduced. Lower air pressure means a tighter pattern so you can work in close with more accuracy and sharper lines.
The other method for delivering the material is siphon feed. In this style of airbrush the material cup is usually mounted beneath the airbrush and relies solely on siphon effect to move the material, Fig. 12. Although not as efficient, some gravity feed airbrushes with side mounted cups offer a siphon feed style bottle as well. Siphon feed is particularly suited for moving larger volumes of heavier material such as paint. The siphon cups are a major advantage for color changes and volume of material. These airbrushes operate best on higher air pressure.
A note about side cups: As a further explanation, side cups can actually be gravity or siphon type depending on whether the paint in the cup is above or below the centerline, or needle, of the airbrush. Or to put it another way, if the side cup can function with an open top, then it is gravity fed. If on the other hand, the lid of the paint cup has a siphon tube in it, then it is obviously a siphon fed cup. Siphon feed side cups are not particularly common but it is worth mentioning in order to add more confusion.

Finally, there are a couple of other airbrush design elements worth mentioning. Some airbrushes are equipped with what is called a MAC valve, Fig. 13. The MAC valve is an attempt at providing air pressure regulation at the airbrush. This can be of value to illustrators who find it helpful to have quick access to air pressure regulation. I’ve talked with very few modelers who find it useful. In this authors opinion it is a questionable feature for model painting since we are not constantly varying air pressure which can be more precisely managed with a regulator.
Rather than using a button, some airbrushes use a trigger, Fig. 14. Trigger operation is a bit different. The feel is more like that of a spray gun. When the trigger is first pulled, airflow begins. As the trigger is advanced, the material needle is drawn back and the material flow increases. If you haven’t used an airbrush with this configuration, you might want to give it a try.


The Paasche AB is the only modern example of the oscillating needle type airbrush. It is a miniaturized version of the Peeler Paint Distributer and the Walkup double action airbrush. It is designed for use with watercolors, gauche, and ink. Used mainly by artists, illustrators and photo retouchers. While certainly exotic in appearance and action, it is not suitable for paint application. It is still used by some artists, but is no longer in production. More information about the Paasche AB can be found here.

How Does an Airbrush Work?
This short video explains the basic principles involved in
The Basic Design and Functioning of an Airbrush
The following video presents the basics of airbrush design and functions ....
Single Action Airbrushes for Painting Scale Models
This video presents information related to single action airbrushes like the Paasche H and the various internal mix, single action, airbrushes.
Double Action Airbrushes for Painting Scale Models
This video looks at double action airbrushes and which ones might be more suitable for painting scale models. There is a very detailed description of the components of an airbrush and how they function along with a discussion of how design differences effect function. Also presented are actual spray patterns from some of the popular airbrushes to illustrate real world results.
How an Airbrush Works pt2
This video explains the design differences of specific types of air-painting tools and why they perform differently. In the second half of the video, I list the specific air-painting tools that I routinely use.

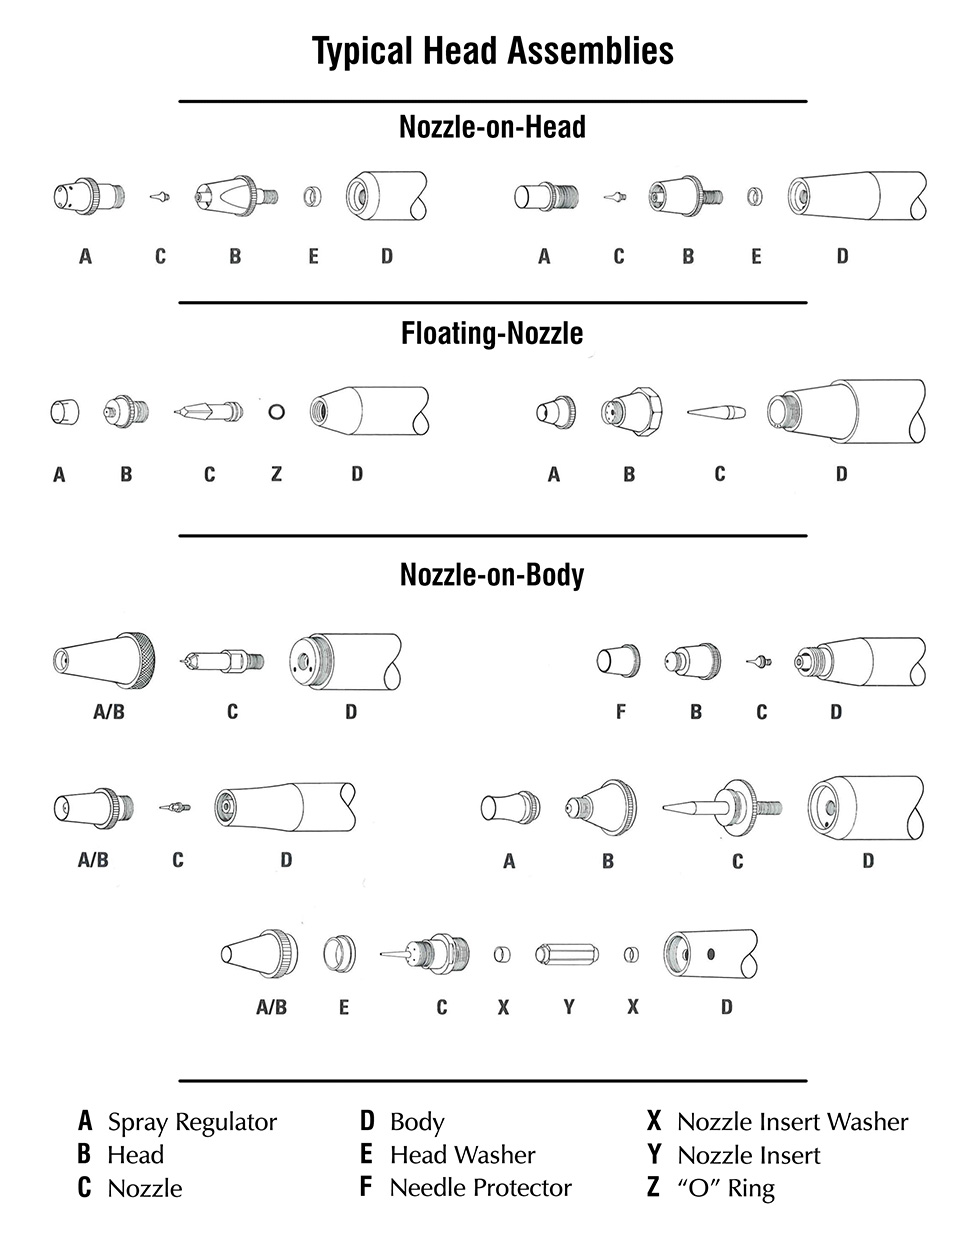
Airbrush Head Designs